SuncrestReef
-
Posts
4,154 -
Joined
-
Last visited
-
Days Won
298
Content Type
Profiles
Forums
Events
Store
Everything posted by SuncrestReef
-
Great question. I just tried setting Defer to 000:00 and got this error:

-
That should be sufficient. I've found my acro's do well except if they are right in front of a powerhead. In too much non-stop direct flow they don't extend their polyps. Another thing that can help is to add a random flow generator nozzle to your return pipe: https://vividcreativeaquatics.com/product-spotlight/random-flow-generator/
-
I put a dozen in my tank back in February. Three months later all my aiptasia are gone, but so are the berghia. They are extremely difficult to find, even when there's plenty of aiptasia for them to eat. During those 3 months, I only saw them about 4 or 5 times, and they can disappear into holes in the rock in seconds. Here was my thread on it:
-
Tuesday's topic -- ATK Programming and Troubleshooting The ATK (Automatic Top-off Kit) is Neptune’s integrated ATO solution for Apex environments. It is sold as a bundled package of components that can be plugged in and quickly programmed through a task wizard in Fusion. However, as I participate in Neptune’s Community Forums and the Neptune Facebook group, I have seen many people reporting problems, frustrations, complaints, and general confusion over the ATK setup or operation. Other than the lack of Trident availability, it seems to be the 2nd most complained-about product Neptune makes. I have personally had no problems with my ATK over the past year, though it did take some time to figure it out and discover some tricks to make it more reliable and to customize how I use it. I hope this tutorial will give you a jump start to skip over the initial problems most people experience. Here is what’s included with the ATK: The basic operation of the ATK is to tell the PMUP (Practical Multi-purpose Utility Pump…only Neptune would create an acronym that spelled backwards describes the actual device) when to turn on or turn off based on the water level optical sensor. As a failsafe, a 2nd optical sensor is mounted just above the first one in case the first one fails. A float valve acts as another failsafe in case both optical sensors fail, and lastly there is a built-in timer that acts as a final failsafe to turn off the pump if it runs too long. While Neptune’s documentation walks you through the ATK setup, they don’t really provide a lot of information about the resulting programming created by the Fusion ATK Setup task. This tutorial will explain each line of code, how to troubleshoot the ATK, and how to modify and enhance the programming for additional features. Before running the ATK setup, I highly recommend renaming your FMM module and each of the optical sensors (and any other sensors you might add to the remaining two ports on the FMM) so when you run the setup task, the names of modules and sensors presented to you for selection are obvious. After running the Fusion ATK setup task, the output connected to the PMUP contains this programming: (the names of your optical switches may not match my example) Fallback OFF Set OFF If ATK_LO OPEN Then ON If ATK_HI CLOSED Then OFF When On > 005:00 Then OFF Defer 000:10 Then ON Defer 000:04 Then OFF Min Time 060:00 Then OFF Let’s walk through each line: Fallback OFF — instructs the Apex to turn off this output if the Apex ever gets disconnected from the FMM. This could also apply if the Apex locks up and becomes unresponsive (which rarely happens). This just basically means don’t run the program if the Apex unit isn’t in control of the situation. Set OFF — This sets up the output’s register to default to OFF if no other conditions are met If ATK_LO OPEN Then ON — ATK_LO is the lower optical sensor plugged into port 1 of the FMM. This is the primary sensor that should do all the work under normal circumstances. If the water is lower than this sensor, it will report OPEN so the pump should be turned On. If the water level is even with the center of the sensor, or if the sensor is completely submerged, it will report CLOSED so this line of code would evaluate as False. If ATK_HI CLOSED Then OFF — ATK_HI is the upper optical sensor plugged into port 2 of the FMM. Like the ATK_LO sensor, if will report OPEN if it’s above the water level, and CLOSED if it’s level or submerged in water. This would turn off the pump if the lower sensor failed to do its job. When On > 005:00 Then OFF — As described in yesterday’s tutorial, the When command is a failsafe that will move the ATK PMUP outlet sider from AUTO to OFF on the dashboard. This will prevent the ATK from running again until you manually move the slider back to AUTO. This typically represents an error condition you should investigate to determine why the pump ran for too long. This will be discussed in the next section. Defer 000:10 Then ON — Also described in yesterday’s tutorial, the Defer command causes a delay before turning on the pump until the water level has been detected as continuously low for at least 10 seconds before turning on the pump. This avoids rapid on/off fluctuations caused by water ripples triggering the optical sensors. Defer 000:04 Then OFF — Same as above, but wait for 4 seconds once the water level has filled sufficiently before turning off the pump. Min Time 060:00 Then OFF — Also described in yesterday’s tutorial, the Min Time command forces the ATK to wait at least 60 minutes before allowing the pump to turn on again. Here’s an illustration of the ATK when the water level is normal: As water evaporates, the lower sensor reports OPEN and triggers the pump to turn on. Once the water level returns to normal, the lower sensor will report CLOSED and the pump should turn off: If the lower sensor fails for some reason and the water continues to fill up, the upper sensor will report CLOSED. This should cause the pump to turn off: If both the lower sensor and the upper sensor both fail, the float valve will pinch the tubing to stop the water flow: While this should prevent a flood in your house, it will not turn off the pump since this is a simple mechanical valve and does not communicate with the Apex. In this situation, the pump will continue to run until the When timer expires, then the pump is turned off and the ATK tile itself is changed from AUTO to OFF: You should also receive an alert from Fusion for this error condition. Troubleshooting If your ATK isn’t working as expected, here are some basic troubleshooting tips: Make sure the PMUP output tile is set to AUTO on your dashboard. It's amazing how many people forget this one basic principle of Apex operation! Manually move the PMUP slider to the ON position to confirm the PMUP powers on and pumps water. If it doesn't move any water, verify the 24v power adapter is firmly plugged in to the FMM and that it has power. Also confirm the PMUP is fully submerged in the ATO reservoir, and that the tubing is not kinked or blocked. Remember to move the slider back to the AUTO position before continuing to the next steps. For testing purposes, delete the Min Time 060:00 Then OFF, or change it to 000:01. This will allow you to perform testing immediately without waiting an hour in between tests. After testing, remember to add that line back to the programming since it’s there as a safeguard. There’s a delay in updates displayed on the Fusion dashboard screen. To see near immediate changes in switch and outlet states, use the http://apex.local interface rather than Fusion. Ensure your optical sensor plugs are firmly seated in the FMM sockets. You really need to push them hard until they “click” into place. Ensure your FMM module is correctly identifying the optical sensors. Go into the FMM module settings, click Configure, then confirm outlets 1 and 2 are both detected as Optical Sensors: Wipe off your optical sensors if they are dirty. When you’re testing, dip the lower sensor in the water and verify that the tile on your dashboard changes from Open to Closed: If it doesn’t, then either the sensor is defective, not fully plugged in, in the wrong port, or not configured as an optical sensor. Do the same test with the upper sensor. If you submerge the lower sensor, but the upper sensor on the dashboard changes state, then your wires are in the wrong ports of the FMM. I’ve heard a couple people say the “1” and “2” labels were mixed up during manufacturing. Remember that the Defer statements cause a delay before turning the pump on (for 10 seconds) or (off for 4 seconds). For testing purposes, you can lower the Defer timers, or delete them. Just remember to set them back to the normal values after testing is completed. Enable logging on the PMUP output. This allows you to review its operation later, or to remotely check in on its activity. Neptune also has a troubleshooting section on their web site: https://www.neptunesystems.com/getstarted/atk-help/ Customizing your ATK programming The standard programming created by the Fusion ATK Setup task is fine for most people, but there are a lot of extra features you can add by customizing your programming. I have made the following changes to my ATK programming: Added an additional optical sensor named FW_LOW inside my 75 gallon RO/DI storage tank to turn off the ATK if the water level is too low Added a virtual outlet named Maintenance to disable the ATK while I’m conducting maintenance. I’ll cover virtual outlets in Thursday’s tutorial. Lowered the When command timer from 5 minutes down to 3 minutes. In my sump, the ATK should never need to run for more than about 1-2 minutes, so 3 would be abnormal. Lowered the Min Time command timer from 60 minutes down to 30 minutes. Here is my customized ATK_PMUP output code: Fallback OFF Set OFF If ATK_LO OPEN Then ON If ATK_HI CLOSED Then OFF If FW_LOW OPEN Then OFF If Output Maintenance = ON Then OFF When On > 003:00 Then OFF Defer 000:10 Then ON Defer 000:04 Then OFF Min Time 030:00 Then OFF That's all for today. Check in tomorrow for a tutorial on Power Monitoring!


-
I reduced the amount dosed at night, increased the amount during the day, and shifted the schedule to later in the day. My lights reach maximum intensity at 9am, but I moved the increased dosing schedule to start at 10am based on what Trident was showing in the graphs above. From this base schedule, the Trident then micro-adjusts the amount and frequency throughout the day based on its measured readings. Here's the actual amount dosed today from the logs: The individual dosing frequency ranged between every 10 minutes to every 16 minutes. My alk and calcium dosing are basically on the same schedules.


-
It looks like the changes I made to my dosing schedule yesterday are paying off:

-

June Picture of the Month - Chalice Corals
SuncrestReef replied to milesmiles902's topic in Show Off / POTM
Chalice name??? -
June Picture of the Month - Chalice Corals
SuncrestReef replied to milesmiles902's topic in Show Off / POTM
I knew my Hollywood Stunner shot wouldn't make the cut! -
I just picked up a frag, so I'm all set for now. It's a little bit muted, but I'll see if I can get it to color up in my tank. Thanks to all who responded! Mods, please close.
-
Today's topic -- Timers: OSC, If Time, DOW, Defer, When, and Min Time One of the most common tasks in reefing is to turn on and off a device on a specific schedule, whether that’s based on time of day, a repeating cycle of a number of minutes or hours, or on specific days of the week. The Apex gives you a number of choices on how to program outputs based on timers, each with a specific purpose: OSC: A repeating On/Off interval, where you specify the number of minutes & seconds to be ON, and the number of minutes and seconds to be OFF If Time: Turn on or off between specific times on the clock, down to the minute DOW: Turn on or off based on the day of week Defer: A delay of time in minutes and seconds to wait before turning on or off When: A failsafe to switch an output from AUTO to OFF if it has been on or off for longer than specified in minutes and seconds. Requires manual intervention to reactivate the automatic programming. Min Time: A delay of minutes and seconds before the output is allowed to turn on or off, regardless of the programming conditions Some of these timers can be combined to achieve unique requirements, such as to turn on a pump every day from noon until 1pm, except for Saturday and Sunday. Let’s look at examples for each of these timers: OSC The OSC (short for Oscillation) command is great for turning things on and off in a repeating cycle. It uses three separate timers: OSC MMM:SS/MMM:SS/MMM:SS Then [ON/OFF/Profile] The timers define Delay before first run / Time to run / Delay until next run The maximum value you can specify for any one of the timers is 999:99, which equates to 16 hours, 39 minutes, 59 seconds. Here are a few examples: OSC 000:00/005:00/005:00 Then ON This would turn on the output for 5 minutes, then turn it off for 5 minutes, and repeat indefinitely: OSC 000:00/007:00/002:00 Then ON This would turn on the output for 7 minutes, then turn it off for 2 minutes, and repeat indefinitely: OSC 007:00/002:00/000:00 Then ON This would wait for 7 minutes, then turn on the output for 2 minutes, then turn it off for 0 minutes. It would then repeat the 7 minute off, 2 minute on cycle. One reason to use the initial delay would be to stagger two different outputs so they don’t run at the exact same time, such as dosing pumps. The odd thing about the initial delay timer is that it calculates from midnight of January 1, 1996. If your timer values added together are evenly divisible into 1440 (24 hours), then your output will always come on at the same times each day. If they are not divisible into 1440, then each day will be slightly different, and you’d have to do some interesting math to figure out when it would turn on on any given day. My personal example: I use the OSC command to activate my Swabbie skimmer neck cleaner every six hours. The Swabbie has a motor that rotates the cleaning wiper in the skimmer neck very slowly, so it needs to run for about 2 minutes to thoroughly wipe all the crud from the neck. Here is the programming for my Swabbie output: Fallback OFF OSC 000:00/002:00/358:00 Then ON If Output EB_3_Skimmer = OFF Then OFF The first line — Fallback OFF — instructs the Apex to turn off this output if the Apex ever gets disconnected from the Energy Bar where the Swabbie is plugged in. This could also apply if the Apex locks up and becomes unresponsive (which rarely happens). This just basically means don’t run the program if the Apex unit isn’t in control of the situation. The OSC timers in this example are: 000:00 = zero minutes from midnight until the first run 002:00 = two minutes of actual run time 358:00 = 5 hours & 58 minutes to delay until the next run The third line disables the Swabbie from running if my skimmer is off. This would prevent it from rotating accidentally if I’m performing maintenance on the skimmer or if it’s off during a feed mode. Since my timers multiplied by 4 = 1440, my OSC timers trigger the Swabbie at the same times each day: Midnight, 6am, noon, 6pm. If Time If Time is used to turn on or turn off an output between a range of time: If Time HH:MM to HH:MM Then [ON/OFF/Profile] The If Time command is much simpler than OSC, but it does have a few intricacies to be aware of: The times can only be specified in hours and minutes (in 24 hour format), so it is not as granular as the OSC command which goes down to minutes and seconds. A very important thing to know is that the beginning time and ending times are inclusive. For example: Set OFF If Time 10:00 to 10:01 Then ON will turn on the output at 10:00 and turn it off at 10:02: This means that the shortest duration you can run an output using If Time is actually two minutes. You cannot specify the same value for the start and end times, so 10:00 to 10:00 is invalid. If you want to use If Time for a shorter duration, it would need to be combined with the Defer statement: Set OFF If Time 10:00 to 10:01 Then ON Defer 001:00 Then ON This will cause it to wait until 10:01 to turn on, then turn off at 10:02. effectively giving you a 1 minute timer: I’ll explain Defer in more detail in the next section. Another tip for If Time is that you can span midnight with your start and end time. For example, I run my refugium light on the opposite schedule from my display tank lights: Set OFF If Time 18:00 to 08:00 Then ON DOW The DOW (Day Of Week) command can be used to turn on or off and output based on the day of week. If DOW SMTWTFS Then [ON/OFF/Profile] The letters for each day of the week are placeholders, and if you substitute one with a hyphen, then that day will evaluate False and the output will not be triggered for that day. For example: Set OFF If DOW SM-W-FS Then ON This would turn on the output every day except for Tuesday and Thursday DOW is particularly useful when combined with the If Time command. Let’s say you want to run a circulation pump once per day for an hour every day except on Saturday when you are doing maintenance: Set OFF If Time 12:00 to 12:59 Then ON If DOW ------S Then OFF Remember from my introduction section that the last line of programming that evaluates True will dictate what the output does. In this example, the If Time command is true from 12:00 to 12:59, but the DOW command will evaluate True only on Saturday since that’s the only placeholder not replaced with a hyphen. Defer Defer is used to delay taking action on an output for a period of time. Defer MMM:SS Then [ON/OFF] This command is different than other ON/OFF commands because it’s actually delaying the outlet from changing from off to on, or from on to off, for the specified amount of time. In the above example using If Time where we need the output to turn on for less than 2 minutes, but If Time can’t do that, so the Defer delay was used to prevent the output from turning on until the 1 minute delay elapsed. Defer is particularly useful when basing an output on the reading of a probe or sensor. For example, if you have a float switch in your sump to trigger your ATO pump when the water is low, but the water surface has small ripples that can cause the float switch to go up and down with the water movement, it could trigger your ATO pump on and off rapidly for no valuable reason. To prevent this, the Defer command can be used to wait for the float switch to provide a consistent reading for a period of time, ensuring that the water really is low enough to justify turning on the ATO pump: Set OFF If Float1 Open Then ON Defer 000:10 Then ON In this example, the float switch needs to continuously report Open for 10 seconds before the pump will actually be turned on. Once the float switch first reports Open, the Defer countdown timer begins. If after 3 seconds the float switch reports Closed, then the timer is reset to 10 seconds. A good analogy for Defer is the shot clock in NBA basketball. (sorry to those non-basketball fans reading this). Once your team has the ball, you have 24 seconds to make a shot. If the ball doesn’t touch the rim, the ball is turned over to your opponent. But if you do make a shot that hits the rim but doesn’t go in, the shot clock is reset and you have another 24 seconds to try again. The Defer is just a countdown timer that once it expires, the output can then change state. To take our float switch example one step further, I’ll add another Defer to handle the situation when the ATO pump is adding water and the float switch finally reports Closed due to the rising water level. Since there are still ripples on the water surface, it might toggle between Open and Closed several times before it finally settles in on Closed. Set OFF If Float1 Open Then ON Defer 000:10 Then ON Defer 000:10 Then OFF Defer statements can be placed anywhere in the list of programming lines because they apply to the output itself and are not part of what evaluates as True or False. Another way to represent this is: Set OFF If Float1 Open Then ON — — — — — — — — — — — Defer 000:10 Then ON Defer 000:10 Then OFF (don’t put the dashes into your program….this is just a visualization) The program is above the dashed line, and the last line to evaluate as True dictates how to set the output state. The Defer statements are then controlling how long to wait before setting the output state. When The When command is very unique in Apex programming. It is used to switch an output’s tile from AUTO to OFF if a condition is met. It is most commonly used for ATO pump programming, since a failed optical switch or float switch could allow the ATO pump to continue flooding your sump with fresh water, harming your tank inhabitants and flooding your home; or perhaps the ATO reservoir is empty and the pump continues to run dry. Once triggered, the output is forced into manual OFF mode and the programming will no longer operate until you manually move the slider back to the AUTO position. Using our ATO pump example from above, here we add the When command. This assumes that our ATO pump should never need to run for more that 3 minutes straight under normal evaporation conditions. Set OFF If Float1 Open Then ON Defer 000:10 Then ON Defer 000:10 Then OFF When ON > 003:00 Then OFF Like the Defer commands, When may be placed anywhere in the list of programming lines. I tend to place Defer and When commands at the end for ease of reading and troubleshooting. Min Time The Min Time command is similar to Defer, but with a distinct difference: Defer - will delay an outlet from changing its state for a specified period of time Min Time - will ensure an outlet stays in its current state for a minimum period of time In other words, the output must remain in the specified state for the specified period of time, regardless of the conditions listed in the output programming. Again, the most common example of Min Time is for the ATO pump. Rather than having it turn on and off every few minutes as dictated by the float switch for the slightest amount of evaporation, you can force it to run less frequently even though that means it needs to pump water a bit longer. Set OFF If Float1 Open Then ON Defer 000:10 Then ON Defer 000:10 Then OFF When ON > 003:00 Then OFF Min Time 060:00 Then OFF This tells the output to remain Off for at least 60 minutes. Once that timer expires, the specified programming commands will operate again as normal. Hopefully this tutorial has been helpful. Stay tuned for tomorrow's topic -- ATK programming and troubleshooting -- which builds on what I covered today.


-
I think I already found one, so don't frag your colony just for me.
-
Update: I have now discovered 7 of these pocilloporas around my tank, including two on the back wall. These things are survivors!
-
Anyone have a frag of Garf Bonsai available in the PDX area? Mine got stung by an anemone and hasn’t really recovered. I miss its vibrant colors:


-
June Picture of the Month - Chalice Corals
SuncrestReef replied to milesmiles902's topic in Show Off / POTM

-
Introduction Before I get into specific tutorials, I’d like to explain the basics of Apex programming. An Apex system consists of Modules, Inputs, Outputs, and Profiles: Modules: The Apex base unit, Energy Bars, and a variety of add-on modules. Modules are physically connected to the Apex or each other by AquaBus or 1Link cables. Each module is automatically assigned an AquaBus address, from 1 to 49. Inputs: Temperature probes, pH probes, ORP probes, Conductivity (Salinity) probes, optical water level sensors, leak sensors, flow sensors, PAR sensors, Energy Bar watts and amps, Trident measurement readings. All Inputs are connected to ports on the Apex or add-on modules. Outputs: 120v (or 240v international) outlets, 24v DC outlets, 0-10v variable outputs, DOS pumps, WAVs, COR pumps, lights, auto feeders, virtual outputs. Outputs exist on the Apex base unit, Energy Bars, and add-on modules. Profiles: Pump profiles, dose profiles, lighting profiles, WAV profiles, ramp profiles, weather profiles. Profiles are used to apply pre-defined settings to an Output. All programming is applied exclusively to Outputs. The programming can be based on values of Inputs, on the state of Outputs, or can apply settings defined by Profiles. The Apex evaluates each Output programming once per second, so when a condition changes it should react to that change within 2 seconds. It reads the list of program statements for each Output from top to bottom, and determines the state of the Output based on the last line of programming that evaluates as True. For example, if a heater has the following programming, and the water temperature is 77.9 F, here’s how the Apex will decide what to do: If Tmp < 78.0 Then ON If Tmp > 78.2 Then OFF The first line evaluates True since the temperature is less than 78.0. The second line evaluates False since the temperature is not greater than 78.2. In this example, the Apex turns on the heater output because the last line that evaluated as True was the first line. However, in this next example the water temperature is still 77.9 F, but there is an additional condition to be evaluated: If Tmp < 78.0 Then ON If Tmp > 78.2 Then OFF If Output Maintenance = ON Then OFF In this example, we have a virtual output named Maintenance that we turned on while performing routine maintenance on the tank. This could include water changes, cleaning out the sump, making plumbing repairs, or anything where you might not want the heater to come on since it may not be submerged in water. The first line evaluates True since the temperature is less than 78.0. The second line evaluates False since the temperature is not greater than 78.2. The third line evaluates to True because we turned on the Maintenance output. In this example, the heater is turned off. The last line in the programming that evaluates as True will decide the state of the output. The state of an output is not changed until all lines of programming are evaluated. Once we turn off the Maintenance output, the Apex will turn the heater on because only the first condition is True. Again, it evaluates the programming once per second. In general, it’s always best to list the conditions that would turn ON and output first, then one by one list conditions that might turn it off. You can rename each module, input, output, and profile. Using meaningful names will make programming and troubleshooting much easier, so I highly recommend renaming each component as the first step before you do any programming. However, if you decide to rename a component later, any existing programming will be automatically updated to reflect the new name. For example, I have 3 FMM modules, so I named each one based on its function: FMM_LEAK = leak detectors FMM_FLOW = flow monitors FMM_ ATO = auto top off This becomes even more useful if you are monitoring multiple aquariums or frag tanks with a single Apex and multiple modules and probes: Tmp200 = temperature probe in your 200 gallon tank TmpFrg = temperature probe in your frag tank TmpMix = temperature probe in your mixing station (unfortunately Inputs are limited to 6 characters in the name) Inputs and Outputs can be displayed on the Apex or Fusion dashboard as “tiles”. Inputs display as a read-only item, meaning you cannot change its value. It only shows what the sensor or probe is measuring: Outputs can be manually turned ON or OFF, or can be set to AUTO. If you manually set an output to ON or OFF, it will remain in that state until you manually change it. The output programming is only active when the output is set to AUTO, and the state of the output will be displayed above the tile: This brief introduction only touches on the main points of Apex programming. For complete details including how to initially set up the Apex, modules, and configuring Fusion, see Neptune’s official documentation: https://www.neptunesystems.com/support/docs/ Each day this week I will post detailed tutorials on specific Apex programming topics, which I promise will be more entertaining than this dry introductory topic. Monday - Timers: OSC, If Time, DOW, Defer, When, and Min Time Tuesday - ATK programming and troubleshooting Wednesday - Power Monitoring Thursday - Virtual Outputs Friday - Alarms Saturday - Feed Cycles Sunday - Lunar Schedule and Lighting Profiles Stay tuned.


-
Here's an updated video of my Reefer XL 425. I'm pretty happy with how things are looking lately!
-
My wife just sent me this photo from her flight at JFK airport in New York: I did some research and came across this article about it: https://mirpurifoundation.org/mirpuri-news/press-releases/a380-save-the-coral-reefs/

-
It lines up pretty closely to the lighting schedule with a drop-off throughout the day when the lights are on: I think I'm going to shift my dosing schedule a bit.


-
Would you mind posting a photo straight from your camera with no post processing? I'd just like to see how they compare with photos I shoot since I don't do any post processing.
-
Ha! Totally been there! I eventually added an optical sensor in my storage tank so the Apex sends me alerts when it's full. Of course those alerts usually come through around 2am. 😣
-
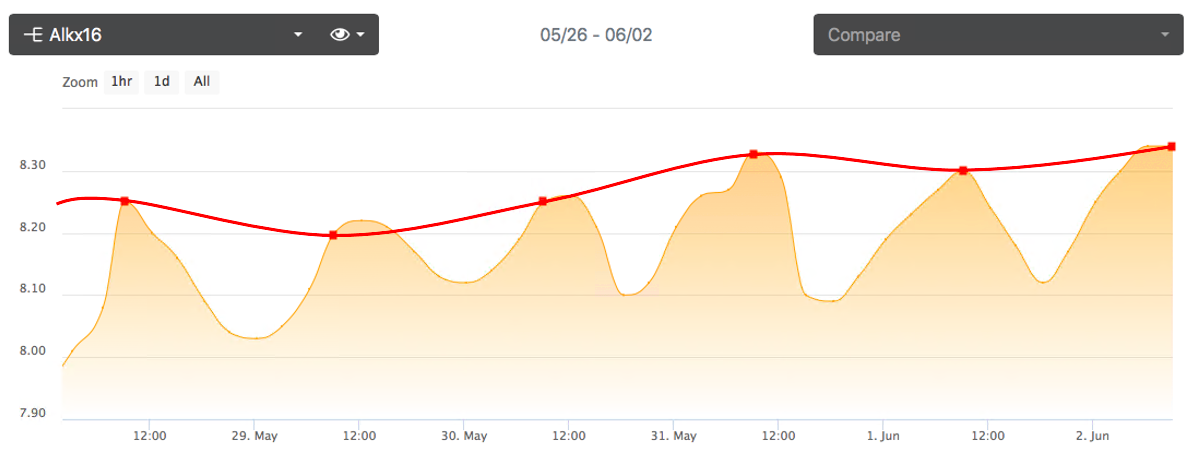
I'm still working to smooth out my daily alk swings. While the Trident does make small adjustments to the DOS to try to keep readings stable, it's still up to you to set the base dosing schedule. I'm currently dosing more during the day and less at night, but I need to tweak the timing a bit more. One thing that's really interesting is how the frequent testing really reveals the extent of daily swings due to consumption. In the past I always tested alk each morning at 9am. If you only look at the Trident's daily 9am readings, it looks like things are pretty stable. But when you factor in the additional daily tests, you see how much fluctuation actually exists: As the old saying goes...Ignorance is bliss. 🤣

-
Preface I first learned of the Neptune Apex in January 2018 while I was researching how to set up an aquarium. I was a complete novice to reefing and aquariums in general. However, with my 30+ year career in IT systems and my love of all things automation, I realized I could leverage my technical background and the Apex to automate most functions on the aquarium. When I received my Apex, I quickly discovered it was a bit different than other automation devices I have used. The included documentation was minimal, Neptune’s online documentation was a bit scattered and disjointed, and the programming language was different than all the widely used standards I was familiar with. I stumbled my way through the basic setup and learned a lot about advanced programming through trial and error while my tank was still cycling. Once I discovered the official Neptune Community Forums I found several examples of programming that helped me achieve what I wanted to build. Over the past year I’ve become much more comfortable and proficient in Apex programming, and I've become a frequent contributor on the Neptune Community Forums and Neptune’s Apex Community Facebook group where I do my best to help answer questions posted by other confused users. From my observations of these forums the most common problems are with the ATK, timers, feed mode, and alerts. I decided to write some tutorials which will hopefully fill in the blanks that Neptune’s documentation doesn’t fully spell out. All of the information I’ll provide is already publicly available, but hopefully the way I’ll present it will explain things more clearly and in a single location. I’d like to thank Zombie and RussM, two of the most frequent contributors on the Neptune Community Forums. Most of the things I've learned were due to their replies to others or directly to my questions. Here are some invaluable resources for Apex programming: Neptune Community Forums: https://forum.neptunesystems.com/forum.php Official Neptune Systems Apex Community Group: https://www.facebook.com/groups/neptunesystemscommunity/ Apex Comprehensive Reference Manual: https://www.neptunesystems.com/downloads/docs/Comprehensive_Reference_Manual.pdf
-
The term "humor" is thrown around loosely here. 🤣
-
Looking for Space Invader pectinia
SuncrestReef replied to nanoreefer's topic in Want to Buy / Trade
I just got my Space Invader a few weeks ago, but unfortunately it's too small to frag at this point. Anyone know if they're fast or slow growers?
-
I'm working on a series of Apex programming tutorials. Starting this Monday, I'll be posting one tutorial per day on the following topics: Monday - Timers: OSC, If Time, DOW, Defer, When, and Min Time Tuesday - ATK programming and troubleshooting Wednesday - Power Monitoring Thursday - Virtual Outputs Friday - Alarms Saturday - Feed Cycles Sunday - Lunar Schedule and Lighting Profiles After this series, if there are any specific topics you'd like covered, let me know.
- 44 replies
-
- 14
-

-