wanareef
-
Posts
1,229 -
Joined
-
Last visited
-
Days Won
2
Content Type
Profiles
Forums
Events
Store
Everything posted by wanareef
-
Looking really nice there, I like those hanger brackets. Are you using a "flat gasket" for a seal on the top?
-
Too bad your so far away or else I'd take them all (whistle)
-
The hook part is to keep the box steady by resting on the edge, if it's a glass tank then it'll just hook on to the the edge of the AGA and you can just position the box to where you want without it filling up with water and the camera.
-
If only I had water in the tank DOH!
-

FREE/CHEAP STUFF!! ESTABLISHED LR SADDLEBACK CLOWN MORE!!
wanareef replied to GroYurOwn's topic in Classified Threads
Sent PM (clap) -
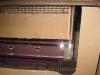
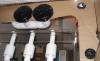
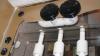
Franklin No, it's not bean animal's overflow. Instead it's the Hofer Gurgle Buster. With this external overflow there is no chance of flooding. Once the water level goes below the "holes" in each of the tubes no more can come out. The sump I will be building will hold a total of 44gals with only 33gals of it working. That external over flow box will hold a total of 4.6 gals of water and up to the drains hole's in each tube only 2.2 gals of water will flow out - 2.4gals remain in the overflow and with 11gals "over head" in the sump, I should be safe. (whistle)
-
james I'll be putting my sump together soon any chance for some of that 'better stuff"? 4 just evaporates too fast for me, even using pins, I'm sure your special blend is slower evaporating. Too bad they got rid of #5.
-
I set up an diy Kalk reactor for the top off. This would help.


-
Almost forgot, cut this thing today while I was making molding. 10" cast acrylic tube for the skimmer body, last years price $65/ft DOH!

-
Darn limit of 5 pix's,

-
Did somemore work on the stand. It's painted with what little paint we had left over. I really like that sea foam green. Anyway all the corners on the inside have been caulked and painted, will add another layer of green over the purple to even it out. I use Wainscoat paneling and made my own molding. I didn't like what both Lowes and HD had on there shelves or there prices. But I did get some 1x2's that had a vertical grain that I will be making corner molding with and to finish off the top of the wainscoat and where the tank was, I made a coma like molding to fit and cover the wainscoat. In the bottom of the stand is a piece of 1/2" dense foam for the acrylic sump. Under the main tank and stand is another piece of 1/2" dense foam. Just have to cut the corner molding for the outside corners and make some doors and will be finished with the stand. Next project - DIY Sump and a clone Deltic AP1003 skimmer using 2x Sedra's w/mesh mod.


-
That curve is about 1 1/2", if not I can cut it off near the top end
-
Well it's still here. That tan paper is just the protective layer and will come off. The paper is on the bottom and it's 3/8" acrylic. This is the part that you have to be careful of so as not to scratch it too bad, maybe use a nice soft towel to store it in. We'll meet up one of these days.


-
I would reconmend using a brace on top of that 1/4" acrylic and then would say that 3/8" would be better, less bow but still would need bracing at the top. Here is some good info on working with acrylic. For the solvent, use Weldon #4 and a applicator bottle, eaiser that way. This is what I used to build most of my stuff, post #16 of my build. good luck
-
Next time I know the kids are coming up for a visit and you still have not taken care of your door, I'll just have them stop by and pickup what you got to fix.
-
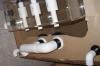
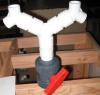
Thanks guy's. This is from learning from the first tank, a long skinny AGA 100gal that only cost $50 from Cali - bought sigh unseen. Had little chips in the plastic trim some small scratches but held water. Too hard to aquascape in 16" of area. Did some drilling for the closed loop. got these 2' BH's from with 6" strainers. Kind a big but it's on the back side and it'll be hidden with LR and should soften the "suction" from the pump. It'll be a Sequence 3800 for the CL - talk about water movement DOH! The water will exit via the big BH's and return at each corner of the tank. Not sure how to split the corners up yet, but will be using this, last pix found on the same place as the BH's. Maybe put this on top of a rotating ball valve
-
I'm in Portland, Jantzen Beach
-
Too bad you weren't closer, I can do biscuts have both portable and stationary and stile/rail router bits.
-
Just finished this today , my take on the frag rack. I am using nickel plated DXO2's on the inside and found out that using two of these would not work, so using DXO6's on the outside. The PVC caps are 3/4" and I cut a "spacer" of 3/4" PVC to fill the inside of the cap and allow the 1/8" thick DXO2 to fit or the DXO6 3/8" to fit and close off the opening with a piece of 1/8" acrylic. I used #16. On the next rack, I'll just use the DXO6's as there are stronger, thicker but cost more and are on sale 20% off - don't know how long On the outside shot, the left cap has not been trimmed off yet, that's why the rectangular "foot". Next one will be little larger and wider and will need 3 (6) magnets instead of 2 (4)


-
Piero Sent you PM
-
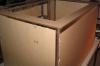
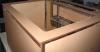
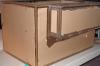
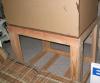
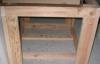
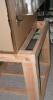
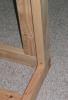
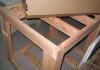
Finished the stand, well just the framing 1. from the front 2. right side 3. part of the back and the trough for the plumbing 4. leg detail 5. the top,under the tank It'll have oak paneling with stile and rail doors, oak of course. Will have a ply for the top and the bottom shelf and it'll be painted to help keep the water out.
-
As the title goes, is there? How long can you keep a bucket laying around before you crack it open and use it? (still new -unopened bucket)
-
Thanks guys. Still more work to be done before I can add water DOH!
-
Eric It's a Sequence external type pump, first used for ponds, then a saltwater seal added to make it usable for "saltwater". Moves a lot of water. hth
-
The tank is almost finished, just have to trim the top and on to the next project, the Stand The 3rd pix is of the external overflow from the front to back with the egg crate above to keep living things in the tank.