

wanareef
-
Posts
1,229 -
Joined
-
Last visited
-
Days Won
2
Content Type
Profiles
Forums
Events
Store
Everything posted by wanareef
-
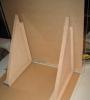
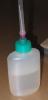
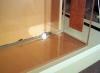
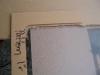
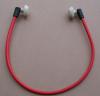
Here's the display tank and one end being assembled. I am using the "pins" method where you inset a "spacer" usually some wire,(for easy pull out) between the pieces to join, for longer contact time for the solvent to soften the acrylic. The pieces are lined up, ruller, square, some support is placed, the "pins" inserted, the pieces double checked again, then you apply the solvent. There is a trick to applying the solvent, these applicator bottles come in handy. When you apply the solvent, squeeze the air out till almost the solvent comes out of the end of the needle, holding the bottle like this, you apply the solvent to the seams by squeezing the bottle and moving along the seam and when you want to stop, just let go of the pressure and lift the end up to stop the flow. Also the best "nozzel to get are these flexible ones" they don't bend like the metal ones do. After you apply the solvent all along the seam, you wait several seconds then pull the pins or spacers out, making sure you don't pull the pieces out of alignment. I used razor blades for wedges case sometimes the work surface is a little uneven and "wedge" the bottom up to meet the other piece. This will ensure bubble free seams.

-
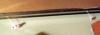
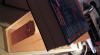
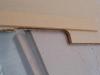
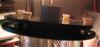
Finished cutting the pieces of the overflow today on the table saw - man was it windy - outside. DOH! Started assembling the overflow today after the triming. Some pix's. The over hang is built in for trimming later on. It helps with appling the solvent with that little extra piece on the other side

-
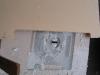
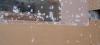
This is where some of that $$ acrylic went to. Not snow DOH!

-
Have some more bits coming in and will chamfrer the top. Mean while, I can start assembling the tank, the bottom end any way more to come
-
This is where it started Ryan I will be using these http://www.customaquatic.com/estore/control/product/~product=LT-PX-250-DE-14 with these http://www.customaquatic.com/estore/control/product/~product=LT-CVCV-LBPEN-DE and with PFO HQI ballasts.
-
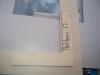
This is a bad pix, but I had the acrylic cut to order, it's too heavy for me to move by myself on the table saw. There are saw marks that have to be cleaned up to get a good bubble free seam, so I routed all the connecting edges (that will see solvent)

-
Cleaning up one long side - matching up the corners

-
Started to route out the opening for the Euro brace, cleaning up one of the four corners
-
Over finished
-
Matching up the corners - cleaning up
-
Using a templet to clean up one of the corners for the overflow
-
Rough routing of the overflow
-
Finally got my Acrylic, one sheet of 3/8" clear cast. Just enough to get 6 pieces out of it. Dimensions are: 22" h x 36" l x 23" w This will use a 3" Euro brace and have an external overflow which is about 25" w x 10" h x 5" d. Been busy trimming on the router so some pix's As always saftey first, gotta have hearing protectors
-
the coral frags under the T-5 are a much deeper color and actually grow and attach faster then in my main display Ideas or Info on this You need some daylight bulbs in that mix at lease 65k. I would keep your current PFO and endacps and just run Aticinics, and go ahead and get some T5's with daylight bulbs 65k's Why not go all the way and get MH's. These http://www.customaquatic.com/estore/control/product/~product=LT-PX-250-DE-14 inside these reflectors http://www.customaquatic.com/estore/control/product/~product=LT-CVCV-LBPEN-DE with some e-ballast will really rock your corals.
-
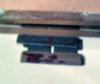
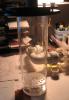
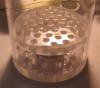
Had some time, scrap material so I decided to make some modules for my new build. This one is a carbon module for running carbon only. It's only 3.25" acrylic cast tube, too small for a skimmer but too good to throw away. Total height is 12" and I will have a bracket under the flange to fit on the sump wall, just an easy lift and place bracket. I'll show that when I make it - be soon. The lid has an "O" ring for sealing and not keyholed lid. The top was made from a piece of scrap that was a little samller than the existing flange. There is a 1" PCV going thru the top lid, to this I will have a union for quick on and off of the unit. There will be several units on this line how it's going to be fed is still in the design stage (haven't made up my mind yet)DOH! The other modules will be Phosban, and a Coil denitrator
-
You gonna to build one of these http://www.reefdiversity.com/DIYPage/DIY_HTML/DIY_ReflectorIndex.htm that solar tube would work really nice for this. I have the pattern printed out if you need a copy.
-
Hay that's great. Sometimes if you run the line under water (in the sump) it'll be quiet or spread the flow with an extra piece of PVC with lots of holes on the bottom side or slits from a table saw. good luck
-
Spectra It that a Phoenix 14k DE? How do you like the color? What ballast are you running them on? I've heard good things about them and will be trying a pair with these reflectors http://www.customaquatic.com/estore/control/product/~product=LT-CVCV-LBPEN-DE and getting the bulbs from here http://www.hellolights.com/index.asp?PageAction=VIEWCATS&Category=815 and using my old PFO HQI dual ballast. Alterego I might still have some used Eye's 65k around, could you use that? LMK
-
Just made in from Red Wind and had a great New Years dinner. Happy New Year to everyone and may this year less flooding, more frags to trade with
-
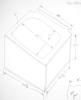
Eric Here's your stand. That sump tote, the largest one will have to be about 21" long and no more than 20" wide that's how much room you have in the bottom of the stand. Then size the others to fit that. If you can't find any that size, you could always get that acrylic sump. It'll take about 5 pc's of 2x4x96" if they still sell them that long, for the frame of the stand. You still have to make up your mind on the finishing of the outside. You'll also need some 3/4" MDF for the top and bottom LMK before you go and purchase the 2x4 there is a way to cull the bad one's and keep the straight one's. Happy New Year

-
What ever will fit in the bottom of the stand. You could keep that 12g going in another room or ???
-
Just incase you need a bigger sump - cheap http://www.reefdiversity.com/DIYPage/DIY_HTML/DIY_SumpRefugeBudget.htm
-
No noise if you use this http://home.everestkc.net/jrobertson57268/HGB/HGB_construction.html Forgot to mention, keep the bit perpendicular to the glass as much as possible and not too big, the BH has a gasket that will help seal the hole. I used a little silicone behind the BH to help seal it, just a little will work.
-
You can drill the glass yourself, it's easy takes a little time. 1. You can use a glass drill bit, borrow one form someone in the club or (whistle) buy one 2. Use a dremel and some diamond bits from Harbor Freight. 3. 2. is cheaper but takes a little longer and maybe 2 of those bits - you get 12 or so in the "kit". 4. You can take it to a glass shop and have them drill it, but they will not gaurente it if it breaks. They charge about $15 - $25 a hole. You'll need the bulk head in hand for the dimensions, draw it on the tank where you want the hole using a china marker, get some clay to make a dam - just a circle of clay around the area to be drilled to hold water for cooling. And go S L O W. It'll cut like butter. You can pratice on a scrap piece first. I've done it using the diamond bits from HF cost about $5, those diamond drill's are about $30-125 depending on size Then you can add a small coast to coast out of glass or even acrylic and have teeth on the front. HTH

-
Swing Shift (whistle)


