

Brian Tesch
-
Posts
86 -
Joined
-
Last visited
Content Type
Profiles
Forums
Events
Store
Everything posted by Brian Tesch
-
I wish I was able to make it. Looks fun!
-
Update Day 2: SUMP Got back early this weekend so decided to spend a little time to silicon the sump together. As mentions above I used a 40G Petco tank for the basis of the and ordered all my baffles from Tap Plastics cut to size. Also mentioned above I used ABS for the baffles for a number of reasons. #1: 1/2 the cost of acrylic. #2: 100% opaque so it will cut down on the amount of light going from the refugium into saying the Skimmer chamber. So far I am happy with the choice, one thing to note about ABS is that it only has 1 smooth side. The other side is textured. That isn't a big deal for me since each baffle will only have 1 of its sides "lit". So Since all the texture sides are not on light producing sides I am not worried about scrapping algae off. The textured side isn't exactly rough either, just has a bunch of bumps, see picture below. Ended up going with sheets that were 3/8's thick because it was only about 10% more than the 1/4 cost so "why not" but ultimately baffles that thick is overkill. #1: Baffles Dry Fit. #2 Baffles Attached. Key Chamber Dimensions: Refugium: 16x18x12T 15G Mini Frag Tank 10x10x10T 4.5G Last note is the baffles are all cut to the top of the tank while the flow heights are drilled on the side to help cut down on light going over the baffles. Will probably create some simple walls to go around the refugium light and the frag tank light to add even more light protection. In the refugium 4x 1" holes were drilled which should handle the targeted at just under half full.


-

Lewisriverfisherman's 20gal Nuvo Fusion Build
Brian Tesch replied to lewisriverfisherman's topic in Tank Threads
Tanks looking good! What kind of electric thermostat are you using and how often do you calibrate it? -
Not "exactly" at the same time, I technically started my build first.
-
Independence is seeing a drastic increase of 75G reef tanks being built. Haha. Excited to see your approach on a 75-gallon reef tank and obviously excited to see the finished product. Let me know if you need any help.
-
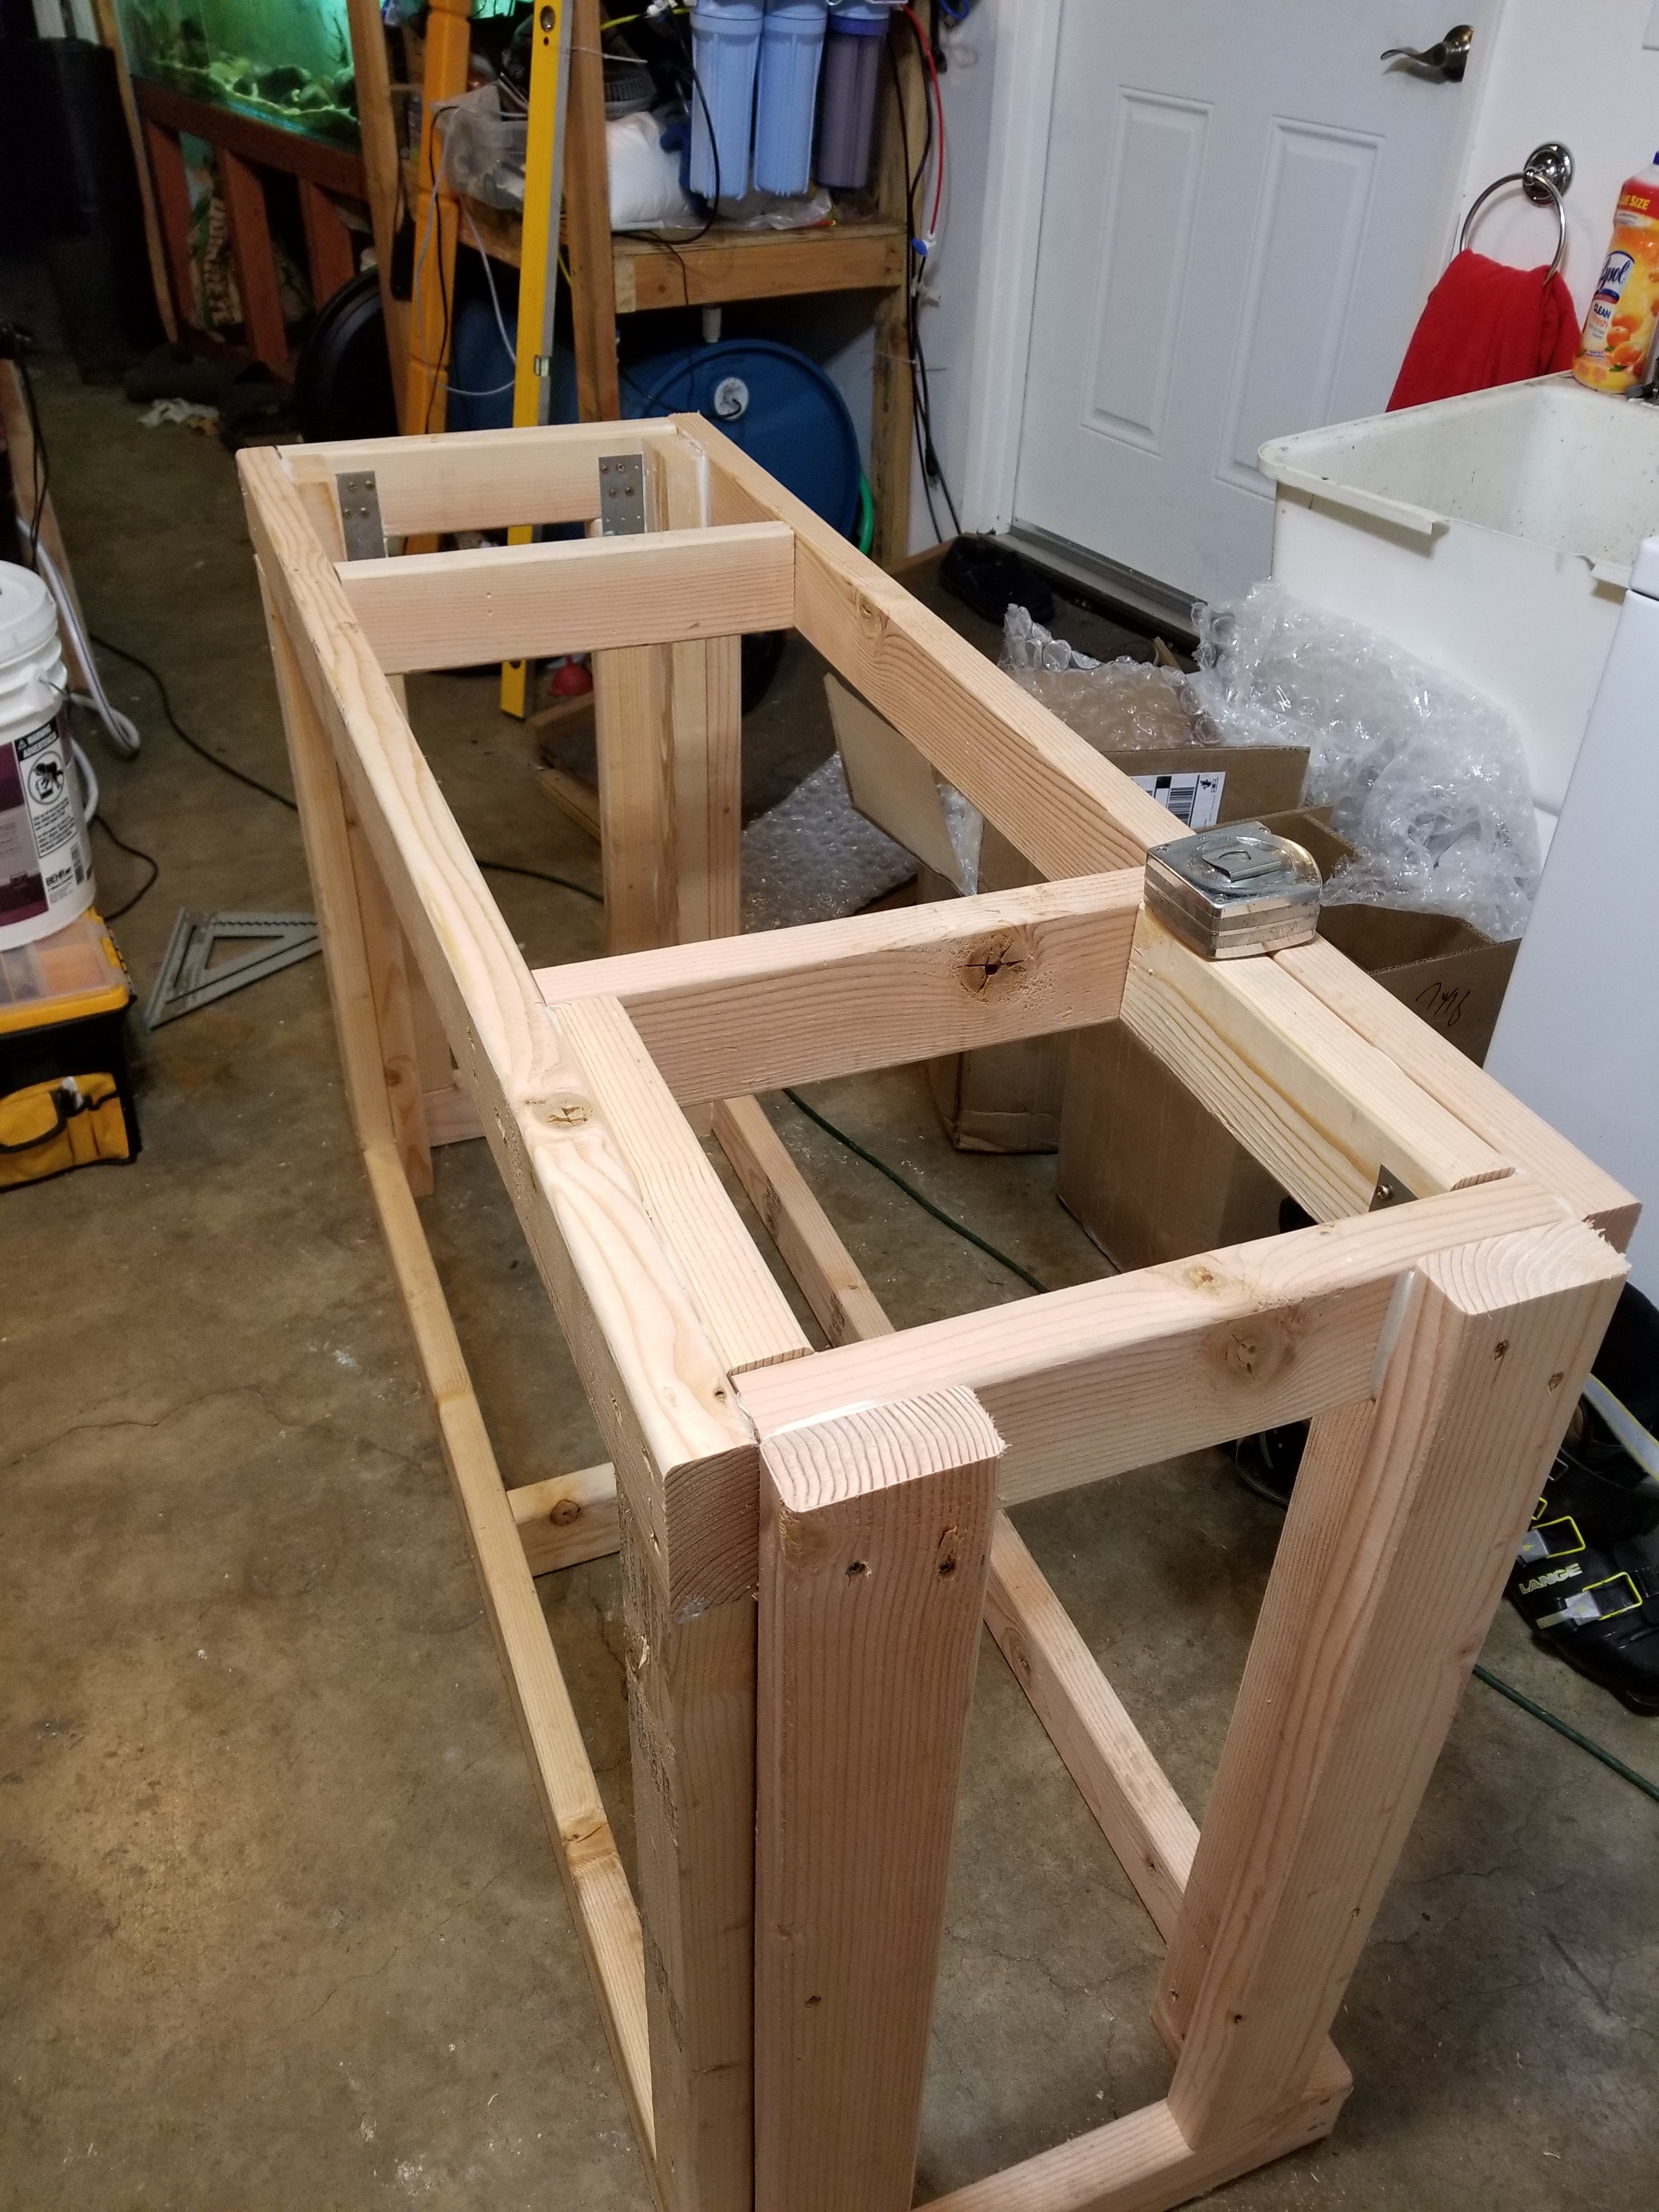
Update, Sort of Day 1. Spent some time today working on building the stand. I've had all the materials ready to go in my garage for a while so I was able to build it fairly quickly. Now let me list out the equipment I have already purchased for the tank: Skimmer: Bubble Magus 7 (bought used off craigslist pretty good condition) Return Pump: DCP-5000 -I've had a DCS-4000 running on another tank for a few years and it has done the job well. Heater: Finex Titanium Series Lights: 2 T5's paired with LED's (see below) Also bought a used Jebao dosing pump good for 4 liquids. (for the triton method). Equipment I do not have yet: LED Lights: Have not purchased lights yet, mainly because I've already got the 2 T5's and although that's not much light it will work during the cycling process. I've sort of struggled looking for a decent light, powerful, but not an arm and a leg to buy. I've heard decent things about the Mars Aqua 165W. It's a black box, but they seem to last, the price is right, and 2 of those fixtures partnered with a nice T5 on each side should make a decent lighting setup for this size of a tank. Any suggestions of other LED's I should look at, roughly around $200-$300? For now, the Mars looks like my best option, the downside is they are not programmable. Any suggestions on wavemakers + or - the $75 range. Big-ish on that. Right now I am looking at the Jebao RW-8 series. That should give my 0-26x is the main displace and I am expecting to get about 12x-14x from my main return.

-
Curious about how your automatic water change system works? Do you premix bulk saltwater in a barrel and them pump it into a tank with a float valve or something along the lines? Or is there a device that can mix salt?
-
Hey Guys, After having an awesome Custom Built-in 60G Seahorse Tank I'm ready for a large tank where I can house more than just a few soft corals and some Macro Algae that I am limited to in my current Seahorse setup. I've started this thread a bit late since I already have the design and have already purchased about 70% of equipment and materials. But first, here a picture 3 years ago building my built in tank (The first 1.5years it was a freshwater planted).Also, the tank was built as a side project why I was remodeling my house. 1st Picture Before. 2nd Freshwater Tank built into Towel Closet. 3rd. Seahorse Tank few weeks after setup. Anyway... lets back to the current business the new 75G, let me start by saying the overall goals I would like to achieve, ranked in order of personal importance. #1: Design. Probably the most important factor in any tank is the design and attractiveness. (except for my 125G bass tank in the garage I could care less about that sucker). Not only do I want healthy colorful livestock but I want an aquascape to lay the foundation of the tank and a stand that is equally appealing and adds "beauty points" to the overall display" #2: Ecosystem / Equipment / Health. Basically, I want my tank to be able to house a variety of fish corals and maybe a few clams healthy. However, I also want it to be balanced with the second #2 below. #2: Cost Decided to tie this with the category above because I didn't want to look like a monster for putting costs in front of all my future livestock, HOWEVER, I'm not about to starve so my future tang has a better standard of living than myself. Basically, I want a nice looking tank but am also operating on a budget as a college student. I hope at the end this tank will be the best bang for my buck. #3: Maintenance Everything about my Seahorse tank is a lot of maintenance. Everything from the shape of the tank (36x20x18) down to the horses themselves makes it a fairly time-consuming tank, my hope for my 75G will be to have a low maintenance system. Maybe not the "Ultra Low Maintenance" systems the BRS crews are building but still lower than average. On the left is a brief sketch of the end goal tank design and the sump. Sorry I didn't have 10 hours to spend building a 3D model on Autodesk. Some people are in college and cont have time for that. Anyway it's not in scale or anything so the tank looks small and stand looks bulky, that won't be the case. However, it does a good job of showing my stand goals. Each "line" in the sketch represents a seem in the wood. Panels marked with a C will be able to open. All of the cabinets will be European style with hidden hinges so that stand has a modern clean look that I really love. Similar concept to the red sea systems. As you may have guessed my overflow and return plumbing will be on the left side of the tank, so the tank will be able to sit flat against the wall. But also could be used as a peninsula tank in the future. Currently, I don't have a place for a peninsula tank so I will not bother on finishing and polishing the back, however, I'll throw in a quick backer board so no light leaks out the sump and will allow me to have the option of building it into a peninsula down the road. The stand will be built in 2 structural pieces. The bottom/ left side will be a single piece. You will be able to slide the tank in from the right and nudge it against the left side 2x2 supports. Then the hood that will be built similar to most hoods in that it sits on the frame of the aquarium. One key point is that the hood will slide in from the right and lock with the main structure via the roof will be a single piece of plywood all the way across. So that will fit inside the walls of the left side and should make a seamless finish, that's strong, and will easily be taken apart in the future. Let's briefly talk sumps. I'm using a 40G Petco breeder as a cheap sump I will be installing some ABS dividers from Tap Plastics. Almost ordered some cool semi clean neon acrylic green dividers but honestly, ABS is 1/2 the cost and will block 100% of the light between the chambers. Anyway, Im using a Bean & Animal overflow design that will go directly into the sump. Literally directly since the sump will sit in the left corner of the stand that means since its offset the overflow pipes are a straight shot into the sump. The refugium is going to be roughly 15 gallons which will be 20% of MD. I'm planning on using the triton method. Everything else is pretty standard, one thing I am doing is building an in-sump small 10"x10" frag tank/nursery. It will be plumbed attached to the main return pipe so I can regulate flow but also would technically be its own little system in you close the pipe. Again part of the reason is just to have a little frag tank, but also I would like to try out raising a baby clam (2" ish). A friend has a fair amount of success with baby clams by placing them in separate chambers then the main display a few times a weak with the water full of phyto allowing them to eat a lot of phyto. This is my approach on that concept basically during normal hours of operation its apart of the main display water volume, but maybe for an hour, I can turn off the valve and poor in some phyto allowing him to eat. Any clam experts out there? Am I crazy? I'll talk more about equipment later, for now, I will through up a few more pictures of some stuff I have laying around the house ready to go. #1: Plumbing! #2: Overflow #3: 75LB MarcoRocks


.thumb.jpg.55f7c54c4d181be331dc93dd463a1e38.jpg)
-
Unfortunately, I will be working at Newport this weekend. While I would love to go, I think I am going to have to wait for the next one to roll around.
-
Small world indeed, I live just off Main St. boarding Independence park. I also purchased some Zoa's from you a few months ago. I appreciate the offer if I ever need help I will let you know, and will definitely contact you when its cycled going to need some corals to fill this thing up.
-
Hello Everyone, Just another aquarium addicted that has talked all of his friends/families ears off regarding tanks. I figure I should probably join a forum before I start losing friends. Haha, I've at least 5 aquariums for the past 7 years of my life but am relatively new to saltwater stuff. My first SaltWater tank was finished in Fall 2016, a custom tank (20Widex18Deepbuilt inside of a closet to give it the built into wall look. Its a 60 gallon and I started with 5 young Erectus Seahorses which have been a lot of fun, and nothing short of an adventure. They have all grown up with unique personalities, colors, and even body designs despite looking fairly similar a year ago. Anyway, the Seahorse adventure has sold me on the salty side of the aquarium side so much so I am tearing down a few of my freshwater tanks and am building my dream saltwater tank. In fact, I just drove down to Home Depot today and picked up all the hard materials I am going to need for the new tank, plumbing, and stand. I am going to start construction on the Stand tomorrow after classes are done. Sometime this week I'll jump over to the DIY thread and spend some time explaining every aspect of the system. For me, the stand as a piece of furniture is just as important to design wise and tank itself. Also although the Seahorse tank has been fun I learned a lot of lessons from stuffing a tank into a closet. It may fit, but it doesn't mean it should fit. For the new 75G, I am going to take everything I learned from my first tank that worked and double it. I have also been watching BRS's ULM series with interest. The goal for this 75 will be a beautiful tank that can house a nice variety of corals, fish, and clams; but also be relatively low maintenance.


.jpg.0952c3398db710252ff76211d6f611a4.jpg)