milesmiles902
-
Posts
1,718 -
Joined
-
Last visited
-
Days Won
14
Content Type
Profiles
Forums
Events
Store
Everything posted by milesmiles902
-
I re-enforced mine with 90 angle metal braces, some more screws and gorilla glue - but the reality is, I have never had one break.
-

August Picture of the Month - Acanthastrea
milesmiles902 replied to milesmiles902's topic in Show Off / POTM
bump -
Participating in the free microbiome analysis (PNWMAS April meeting)
milesmiles902 replied to EMeyer's topic in Aquabiomics
I'm kind of curious what bacteria or microbes they are looking for. Share your results! -
Participating in the free microbiome analysis (PNWMAS April meeting)
milesmiles902 replied to EMeyer's topic in Aquabiomics
-- -
Something that is really interesting about the Vectra pumps -or- Ecotech in general. They really don't have much specs on their pages for anything. For example, Reefi lights vs Radions lights. Go check out Reefi-Labs to see a good technical analysis. In my situation, Pounds per square inch (PSI) of the pump is really important, which Ecotech doesn't give for any Vectra pump. Who cares about 21.5 ft of head height for an M2 when they don't even say salt vs freshwater. They are completely different weights per gallon and will go different heights. So, I had to assume it was saltwater to get the pressure and then assume the plumbing was 1.25 inch diameter, which matters too. The reality is, gallons per hour mean nothing when there is varying head heights and diameter piping. The reason is - if I was going to have this pump saltwater down into the water vs upward into the sky. It's completely different distances and PSI is important to know. Mainly because total mass being pumped changes with distance of pumping. Pumping down into water has higher pressure by the water above it than pumping into the sky. That being said, Ecotech could do a better job on specs. My M2 Vectra can only pump 3 ft into water with those dimensions of that right container above (0.75ft^2) and 21 ft high.
-
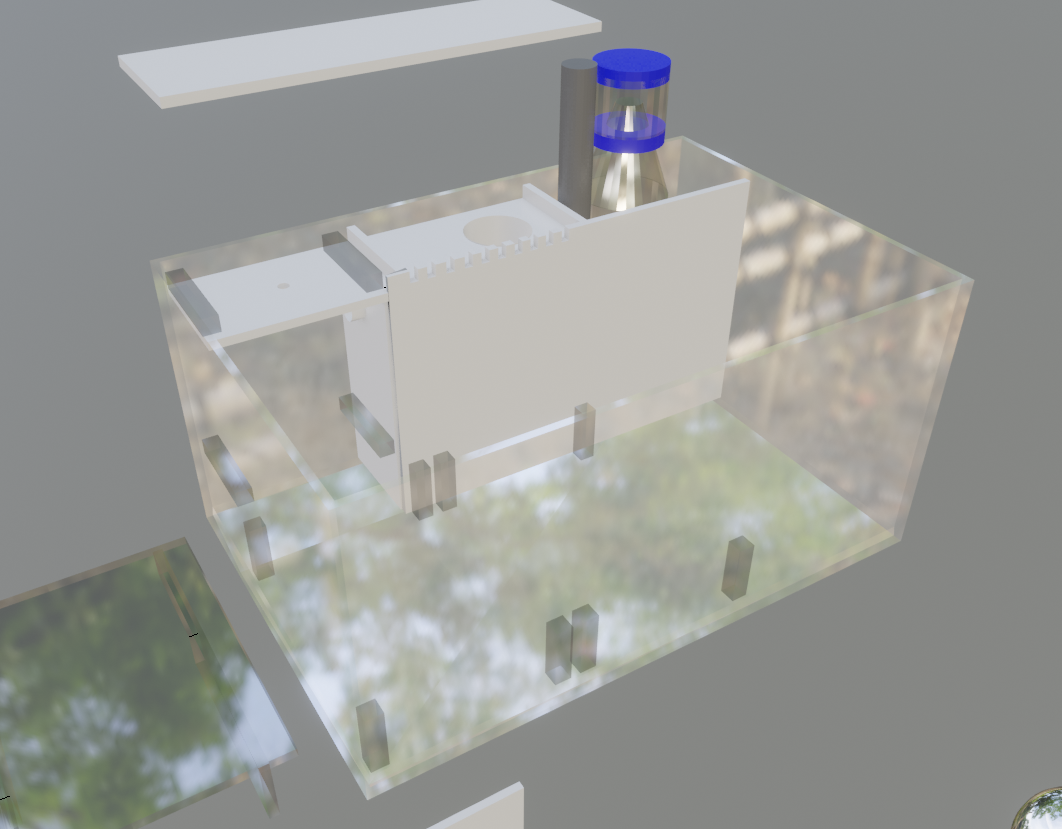
This project will be my first attempt at acrylic. The Fremont Runner will be ongoing, but I realized, setting up my 75 gallon with the sump is still something I cannot easily move. This is a problem because the landlord could say, "We're not renting anymore." - which is what happened at the old place. I'll still be looking for a temporary $150-250 a month art studio for my tanks, but it's nice to have something that could get me up to speed. So, with accelerating 3D capability - I present the Fremont Runner Jr. It is a all-in-one 70 gallon acrylic tank that will never need to be de-plumbed in a move. The above picture demonstrates the overall scheme to this all-in-one design. Unlike most bio-cubes or other all-in-ones, this design has a cross between an under-gravel filter and a traditionally designed all-in-one. It still utilizes all my old equipment, but sits at 3 ft long x 2 ft wide and 1.5 ft tall. It will go on a metal stand that I already have. The water flow in this all-in-one (at the top) is very similar to traditional over-flows, but on the return functions completely different. It returns from the base of the back-plate, rather than the top. Then, the water will go around the lower baffles and exit to the right. If made out of acrylic, this design will allow for large amounts of chaeto-morpha to be grown at the base of the tank with the same lighting system. It will grow beneath a plate of acrylic, have heavy flow because of the return pump and utilize much of the wasted light from above. This design is very similar to drop-off or ledge tanks, but with a flow-competent feature. Each of these plates will be screwed on at the four-corners with plastic screws that go into the 1x1 inch bracers. In this manner, each base compartment can be cleaned of detritus, removed and/or filled with rock, carbon bag, bio-balls, sponge filters etc. Both base compartments could even be removed with nothing there, but the bracers. The water will continue to flow from the base of the back plate and might even traverse upwards through a frag rack. As seen, the upper over-flow lid can be removed to show a normal overflow with a 4" filter sock capable all-in-one. Behind the tank lies my old Vectra and Reef Octopus protein skimmer. In this design, the water flows through the grates, down through the filter sock, into the pump (which will have a screw on PVC attachment) then, into the right compartment and finally back into the tank. I realized that this compartment would likely fill up with air, so I added a hole at the top, which may have a different diameter. Most traditional all-in-ones have chaeto in this back area. That's entirely possible with LEDS in the right-compartment, but instead I am going to put rock in this location because it will have heavy flow without detritus accumulating in the bottom. Since this compartment is 1 ft wide - a carbon reactor might be added to the return with a ball-valve. ...but how would you get the rock in there? Well, this plate also screws off with plastic screws. Now, I can lay all my rock into a place that I don't mind getting scratched. Maybe you don't want any of the compartments and a larger aquarium? That's perfectly fine with this design. You could even still stack your rocks on the back wall as seen in many freshwater designs without scratching the front. Sure, you have to get your hands wet to unscrew the plastic screws for each compartment, but with the flexibility that this tank provides. It seems pretty reasonable, especially if you have smaller size frag racks. Smaller return pump and skimmer designs might come in the future because there is the chance of skimmer overflow, but the reality is, it's capable.. Now, after I pull all my pumps out. It's just an acrylic box that I can lift or put into a car. Later design features might come, but this is the tank that will get me up to speed - The Fremont Runner Jr.


-
I will forever remember this coupon. I see no expiration date. The good science you did as compared to other brands (https://www.reefi-lab.com/reefi-led-duo-info/ ) make these lights well worth it. I imagine I might get one in the next year. I am modifying the Fremont Runner into a more portable all-in-one Fremont Runner Jr, while I collect Pacific Northwest Corals. I imagine one of these would mix with the depth of the tank and dimensions. A+ on the Reefi-Lab technicals.
-
Building an over-complicated system - 60 gallon lagoon
milesmiles902 replied to milesmiles902's topic in Tank Threads
This was the end. Darn, moving! https://photos.app.goo.gl/yPfjYSqwCMSju5kF7 -
To save money, I'm going to: Setup my old 7 year - 75 gallon with the original stand and sump - in home. I will get the rock going at my new place. Build a 1 ft high x 4 ft long x 2 ft wide out of acrylic with my old wood stand and build a medium-large sized sump on it. I will not set this up, but eventually use it for a quarantine with my old 75 gallon parts. Scout small business and commercial spots in the Fremont area. I found tons of small art studios and small work-areas for people - below $215 a month. They're real close too. Setup my quarantine and slowly build a small coral home. It will be called the coral home. Slowly build it up as I live in the area. Beneficially doing it off-site, so that I don't have to deal with moving my main tank again. I appreciate all the help from @Exodus @R-3 and @badxgillen, but it's too much work to ever do another time -or- twice in a year. Probably go to UW for physics, privately tutor, and work in the area for the rest of my life. This project will continue when #1 comes around. It's going to be a long road of collecting coral.
-
I thought about voting on it, but then I realized, maybe it's not even possible. Is it possible to have different colored markers for the main public aquariums, such as the Oregon Coast Aquarium and Seattle Aquarium? ...or aquarium builders?
-
Seattle Corals - http://seattlecorals.com/ | 15015 Main St #199, Bellevue, WA 98007 The Fish Store - http://www.thefishstoreseattle.com/ | 12320 Lake City Way NE Seattle, WA 98125 King's Discus - No Website (Yes, saltwater) | 805 S King St, Seattle, WA 98104 Saltwater City - https://saltwatercity.com/ | 14150 NE 20th St # F3, Bellevue, WA 98007 The Shark Reef - http://www.thesharkreef.net/ | 3656 NW Munson St, Silverdale, WA 98383 Aquarium Paradise - https://www.aquariumparadise.com/ | 11724 Pacific Hwy SW, Lakewood, WA 98499 Sea King Aquariums - https://www.seakingaquariums.com/ | 12005 NE 12th ST, Suite #29, Bellevue, WA 98005 Unrivaled Reefs - https://www.unrivaledreefs.com/ | Seattle, Washington Crystal Reef Aquatics (Aquarium Builder) - https://crystalreefaquatics.com/ |1918 Iowa St, Bellingham, WA 98229 Clayton Aquarium Corporation (Aquarium Builder) - https://claytonaquariums.com/ | 12031 Northup Way #106, Bellevue, WA 98005 Aquarium Concepts (Aquarium Builder) - http://www.aquariumconcepts.com/ | 18110 Midvale Ave N, Shoreline, WA 98133 Seattle Aquarium - https://www.seattleaquarium.org/ | 1483 Alaskan Way, Seattle, WA 98101 Oregon Coast Aquarium - https://aquarium.org/ | 2820 SE Ferry Slip Rd, Newport, OR 97365 When we get Spokane or northern Members - we'll add more!
-
The Reef Room Has Started... sort of...
milesmiles902 replied to TheClark's topic in General Discussion
How's this project going? -
Reminds of the terrestrial version, but just as that snail is a worm, this worm is a fly. Both are pretty amazing.
-
Yeah, I have a circular saw and a saw-zaw. Although, my Dad has the table saw and rotary saw. I bet we'll figure it out what works best. He'll be happy I'm trying to weld something too. Thanks for the help.
-
No, I don't know. There's a table saw around and I believe a router. Although, I might just go the table saw route and buy a new blade. It's nice to have a table to work on. Thanks for the help! I'm glad the tank is small enough to learn on. I hope this thread can help future stand and tank builders.
-
I might do 4 ft long - just for the sake of it. Although, because of the skimmer - the frame will have to be taller to encompass the dosing apparatus. In this case, the turnover will be 0.7 times per minute or 44 times an hour. For either case, I believe it will be a healthy aquarium.
-
I'll have to check them out. It sounds close to where I'll be living. As for making calcium (Ca2+) solutions, it's all I've ever done. Some people use calcium reactors, which accommodate alkalinity (CO32-) too, but I've never spent the money to get one. I prefer a doser and Randy-Holmes Farley Solutions..plus or minus the brand of reagents. I even added it to my model below. 3/8" it is. I'll have to search around. It's looking like I'll have to make a jig for things like the Euro-brace, so I might as well cut everything myself. This is what I did today: I hid the plumbing into a vertical entry and the entire thing is now enclosed by wood on all four sides for a quiet, limited plumbing system. Also, I calculated the turnover on the tank and it was pushing 33 gallons turnover per minute..or in reality, the entire aquarium per minute. So, I made it 5 ft x 1.5 ft x 1 ft. It cut the turnover by half, so the aquarium now turns over once every two minutes -or- 30 times an hour. The entire tank is now 42 inches in height. It's center of mass is pretty low, with the light glare not being an issue anymore. The dosing system is now enclosed into the entire stand too. It will be calcium, alkalinity and a RODI container. As you can see, it's a four-stage Jebao doser. It's from my old tank. One of the major improvements to the model is that it is almost the exact measurements of all the items. The containers are 1x1x1.3 ft, Vectra is 9 inch long etc. The entire build is up to the dimensions of 2 ft wide x 5 ft long. The tank again is 1.5 ft wide, but exactly 1.5 ft in the model. Also, the tank has a Euro-brace that I will have to make a jig for. I am going to try to bring the emergency overflow within 1 inch of the Euro-Brace too. Both the tank and sump will be completely full, with the sump having a few inches of give for drastic situations. To make sure, I put a one-way on the return pump - as I had on my old tank. I believe they work pretty well, but some people believe they have troubles. So, even then, I made sure that the return doesn't come out, but within an inch of the top water-line. I also added ball-valves to the return and overflow. All the other lower pieces have cut-outs for the plumbing too. The lid to the sump is piece-wise and lays on the bubble-catches. It comes in three pieces, which are all supported - without building lips for the lids. There is a double-bubble catch and an earlier one near the skimmer, which will help. I imagine I won't get any salt-creep, nor sound coming out of the stand with lids and wood walls. The only think I'll be hearing is the Maxspect Gyre and light. The sump has no light either. The only place is where it does have light is where I'll put my ball of chaeto - the overflow zone. The stand is now symmetrical. There are three inch feet on all corners, but the lower sump will have slightly different dimensions than the upper tank - due to the vertical supports. I'm glad @pdxmonkeyboy found a place that doesn't do 1 ft strips because I will have to cut them all myself now. The gallons are now pushing 115 with the upper tank being almost full and the lower tank being mostly full. The rocks will likely bring it down to 100 gallons. I thought about adding lids to the upper aquarium. It would make it quieter, prevent spill and evaporation. The light transmission of Acrylite is limited in the UV region, but does absorb roughly 20% of the 400 nm light intensity, then higher-levels of transmission with anything below 400 nm. Also, it wouldn't be bad to have a lid to prevent the rest of the aquarium from UV cracking in the later years. So, I should definitely try to figure out how to do it without them falling in. The price has gone up a bit, but compared to some commercial tanks of this size with sump, gallons, lids etc. It would definitely be more. As compared to my rent, it's still cheaper.


-
I doubt it's supporting members only, but you should log yourself in the member map: http://www.pnwmas.org/membermap/ (I just did my city for safety reasons). My friends live up in Mountlake Terrace, so I'll be sure to stop by. We can trade some corals and maybe even go down on a shipment from Oregon aquarium store's or friends. If you need a homemade calibration solution, check-out this thread: http://reefkeeping.com/issues/2004-06/rhf/index.htm It's one of the few places that cite their work.
-
Having 1 1/2 will be better support for the base of the aquarium. If you suggest it, I'll try to find some. I'll probably cut the acrylic and steel tubing myself, but the welder is my Dad's and he'll be around. I've use his plasma cutter and arc welder before, but never MIG or TIG? Here's some of his work: It's a Frankenstein with a '59 frame and 57' body. I think? Either-way, I am sure he'd be happy I'm showing the forum some pictures. I think he did that thing 2-3 times too. The box never laid level and he had to figure out the proper angle of decline through trial-and-error. It's been years since welded anything, but you got any tips? I imagine you should spray paint and clear coat them - after you're done for rust? TAPS Plastic has Acrylite, but I am unsure if they have a variety of thicknesses. Although, it doesn't hurt to scout the area. I'm sure I'll find something. North and South are aquarium manufacturers for in-home Acrylic tanks. There's bound to be an acrylic source somewhere. Also, I kind of want to build it to my size and practice building tanks. I'm sure it will come in handy. The 1x1 ft2 dimension means I'll be able to have less thick acrylic too. Maybe a Euro Brace is needed, but that's a thought that can come later. @Blue Z Reef What if I just want to duplicate @stylaster 's tank one day. You know?


-
In support of my new job in Queen Anne and move to the Fremont district. I am going to attempt a "cheap" aquarium build based upon everything I learned in Oregon. To start, I am going to use all my old equipment. Maxspect Gyre x180 Ecotech Vectra M2 (2000 GPH) Reef Octopus Skimmer 48" 6 x T5 Actinic Although, this time, I am going to build an acrylic runner. The acrylic idea came from @stylaster's 312 gallon. The running length idea came from @TheClark. It will be a 5 ft x 1ft x 1 ft. @badxgillen does have a runner with sump, but it's entirely glass. To some extent, the length is dependent on the light, but the real width is definitely less than 2ft. All the plastics will likely come from TAP Plastics in Seattle at $10 a wall. To save money, I will likely have to cut the bubble catches in the bottom myself. Under the tank, will likely be a similarly sized aquarium. The lower sump will be resting on the steel frame to prevent the upper tank from tipping. I want the tank to be able to withstand a large earthquake, so the sump being equal or greater weight at the lowest point of center of mass is important. To prevent the upper tank from sliding around, I will likely glue the tank to the frame or go to the shoe store and get a strip of leather - wrapping it around the steel frame and base of the upper aquarium. I believe either is possible, but steel, stained oak wood and leather wouldn't look bad (better than tape or glue). @Exodus doesn't have leather, but he does have a cool stand and I've seen @MrBret's show stand at frag-fests - it's pretty cool. Also, I've never built a steel frame, but I'm going to try. I've seen enough of @spectra's metal frames to know that they can't be beat. The upper tank will likely be +-172 lbs of seawater and 1 inch x 1 inch hollow rectangular tubing with 1/8 width should be able to handle it, but honestly; I'm just going to go to a Seattle Steel shop and check-out what's cheapest. In total, it's about 30 ft of tubing that will likely be less than $100. I've never built one of these and I'm sure my Dad will have something to say when I attempt to weld it, but I attempted to brace most of the weight. The only thing I am afraid of is that if I utilize wood faces to cover the sump ( @Exodus ), the sump will have to be slightly shifted off of the frame. That being said, I'll likely move the lower braces to compensate. The current feet are because it looks top-heavy and the overall shift is because of the backward facing PVC piping. At the moment, it's looking like something I put against a wall, but it might be an island aquarium with wood on all four sides. If that was the case, I'd likely have a vertical return, rather than a back-facing entry with a non-shifted steel frame. Also, I have stain for the oak wood, which makes it a bit cheaper. The sump won't be completely filled either, but I'm guessing it will be around 60-77 gallons. Cost: Acrylic = $100 Metal = $<100 Wood =$150. Total = $350. As long as it's less than my rent - I'm a happy camper.


-
Surgical Strike - Acrylic Aquarium
milesmiles902 replied to milesmiles902's topic in General Discussion
If I do a runner, it might be a foot in height with egg-crate racks similar to this for the feasibility of stacking frags: That might be the most economical way to have a long-term coral community - 1x4 ft2 runner. Although, what type of acrylic thickness are we looking at? I'm unsure.
-
Surgical Strike - Acrylic Aquarium
milesmiles902 replied to milesmiles902's topic in General Discussion
If I do a ledge, I'd likely put acrylic to support the ledge in the middle of the square face, along with lip the bottom because it would be a top heavy center of mass. Maybe a ledge of some dimensions?...or even a left ledge and a right ledge going down to a center abyss? What do people think? -
Well, friends...the time is coming close for the move of a life-time. Once, us Corvallis folks were most southern part of the Pacific Northwest Marine Aquarium Society. Now, I am the most northern reach of our community. With no intended damage in moving an aquarium, the only legitimate target is to complete our mission of conquering the surrounding infrastructure and utilities for the future generations i.e. The Pacific Northwest. The plan is to no longer exist in the fragile world of glass aquariums; with heavy casualties, but design and improve upon past behavioral damage to eco-life. What this means for us, acrylic will soon be in our future goals. My plan is to build an acrylic aquarium at each site I move. With the beginning constraints being, a 2x3 ft2 perimeter enclosed by wooden trees and forest i.e. 2x4's. The height is the debate. For this shallow aquarium, what do people suggest for height? They will come as 1x3 or 2x3 ft2 strips from the plastic company (Roughly $10 each) and increments of whole feet. Should I cut them down? Should I go for a runner? Would it be kind of cool to make a 3 length x 3 ft height with an 8 inch width and ledge reef? What's the proper thickness of Acrylite for an aquarium this size?
-
I have a good feeling ReeFi will make it big.
-
August Picture of the Month - Acanthastrea
milesmiles902 replied to milesmiles902's topic in Show Off / POTM
bump